AAR for my Cataphracts game
Recently, I ran and completed a Cataphracts game, inspired by Sam Sorensen's blog posts. The gist is that it's a logistics wargame that occurs in real time over Discord.
I ran my game for about 2 months, and ended it when one of the factions completed all three of their original objectives. This article is intended as a record of what happened over that timespan. The intended audience is mainly the people that played in that game, though I hope others can get something out of this summary as well.
I have some thoughts on the game as a whole and how I thought it went that I'll save for a follow-up post.
Initial Context
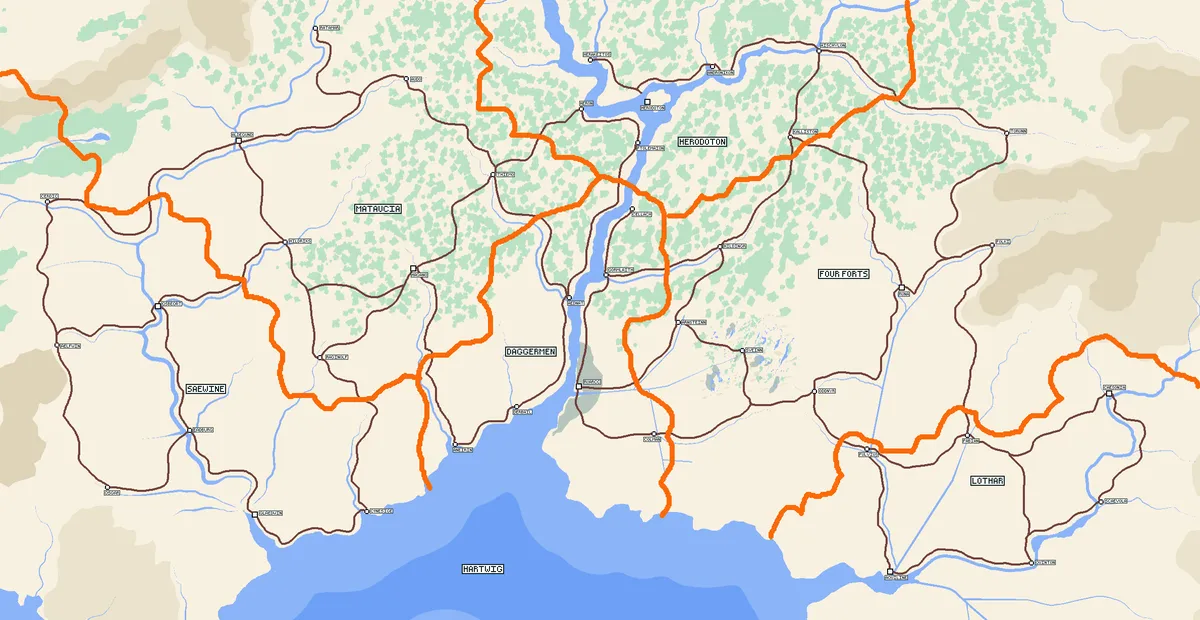
There's 6 factions:
Kingdom of Mataucia:
A landlocked hardy kingdom of dark forests and bloodthirsty warlords.
- Take and hold the city of Glaedwin.
- Take and hold the town of Aneirin.
- Destroy the river chain at Osbeort such that it can never be used against your people again.
Commanders: Darmok, Juno, Lexi (attrit.), Tristan
Starting Forces: 5600 Infantry, 700 Cav
Free Cities of Saewine:
A group of city-states united under a single ruling council and figurehead for the purpose of shared trade and defense.
- Burn down the Hall of Kings in Aldegund.
- Plant the flag of the Saewine at Herodoton.
- Secure the city of Aquilline, whether by taking it or via secure alliance.
Commanders: Mick, Andy, Ragnar1312
Starting Forces: 4900 Infantry, 600 Cav, 14 Ships
Daggermen:
The lands held by the disparate sea-raiders and pirates that fly under the shared banner of the Daggermen.
- Take the Temple of Herodoton and search its archives for any sign of your homeland.
- Take the city of Hagano.
- Take the city of Runa.
Commanders: Punz, Hawbs, Wheezl (attrit.)
Starting Forces: 2750 Infantry, 700 Cav, 9 Ships
Theocracy of Herodoton:
The remains of the old empire, their faith in the gods still burning strong and fierce.
- Burn down the city of Ruarcc.
- Kill the heretic King Goddhard of Mataucia.
- Reclaim the plundered texts of High Priestess Zenobia from the archives at Runa.
Commanders: Bajr, Unusual Cactus, Peanutterz, Jeffenheimer, Deva81
Starting Forces: 3350 Infantry, 850 Cav, 11 Ships
Four Forts:
The fledgling new empire born from the remains of the old, once-balkanized strongholds now united under a single flag.
- Take Fort Catel from the Daggermen.
- Take Caesonia.
- Claim the crown of Herodoton from the Temple and be coronated as king of the Four Forts region.
Commanders: Nobody, Gilben
Starting Forces: 6000 Infantry, 750 Cav
Wizard-Kings of Lothar:
Isolationist wizards looking outside their borders for power for the first time in centuries.
- Take Fort Grainne from the Daggermen. Perform a rite of leyline dispersal while you hold it.
- Retrieve the Orb of Tides from the town of Cynesige.
- Take Fort Stali from the Four Forts region. Perform a rite of dragon awakening while you hold it.
Commanders: Reeves, Tom (attrit.), Miles, Sharis (attrit.)
Starting Forces: 3900 Infantry, 500 Cav, 8 Ships
More information on the factions here.
Week 1:
- All factions forage immediately.
- Saewine probes the western borders of Mataucia, seeing if they can steal a quick victory over Hildriks. They also pillage their own cities and begin the construction of a massive war fleet.
- Lothar sends ambassadors to Four Forts and Saewine, narrowly avoiding an imminent attack by Four Forts via a call for parlay.
- Herodoton sends out messengers to Daggermen and Four Forts, hoping to strike up early alliances. The Daggermen murder the messengers en-route to the Four Forts and forge new messages indicating that Four Forts had better submit to Herodoton and surrender territory. Herodoton sends out armies towards Mataucia along its northern border and its southern border, and crosses the river with the remainder of its forces.
- Daggermen raid along their border with Four Forts. They begin the siege of Hildingr.
- Mataucia gamely fends off raids on all sides. Saewine is fended off of Hildriks in the west, and Herodoton raiding parties are forced further and further north.
Week 2:
- Lothar secures good friendship with both Four Forts and Saewine. A commander of Lothar marches in good faith with Four Forts to the north to fend off what is believed to be an invading Herodoton army. A port and harbor facility begins to be constructed in Aquilline on the behalf of Saewine.
- Four Forts, not finding the expected Herodoton army on their north border, pushes north and takes the city of Kalliston.
- Raiding parties from Herodoton cross the border on both the northern and southern sides. Mataucian forces cross blades with each after lengthy cat-and-mouse chases through the dark forests. The main prong of Herodoton's push into Mataucia is a siege at Thiemo, which is forced to break off and flee after repeated foraging causes a revolt of the nearby peasantry. One of the raiding parties of Herodoton is chased all the way through the countryside deep into Saewine territory.
- Daggermen succeed in taking Hildingr from Four Forts. They torch the fields and salt the earth surrounding the town.
- Saewine and the Daggermen exchange messengers, eager to establish a seaboard alliance. They form a defense pact, promising to help the other if they are attacked.
Week 3:
- After the success at Hildingr, the Daggermen cross the river to the west and send out a diplomatic envoy to Mataucia. The two warlords meet up and discover they have quite a lot in common! A shared distrust of everyone else, a shared love of pillaging and victory, a shared enemy in Herodoton. It looks like the start of a beautiful alliance. Mataucia finishes the conversation by leaping over the table and stabbing the Daggermen's admiral through the chest.
- Four Forts and their Lothar ally continue to push north in Herodoton lands, finding no resistance. They take Aischylon. All involved commanders are deeply suspicious at this point, having been led here initially by threats from a grand Herodoton army.
- Herodoton's eastern forces move to defend Aischylon after receiving messengers indicating that multiple settlements had been taken. Herodoton's western forces retreat back to their own territory and start recuperating after their losses last week.
- Lothar's alliance with the Saewine is cemented. Both factions agree to help the other agains the marauding inland factions. Privately, Lothar is only helping Saewine to secure access to a magic artifact and the target of one of their victory objectives. Saewine is only helping Lothar because the alternative is an amphibious invasion to secure one of their victory objectives. Neither reveals this to the other at any point.
Week 4:
- Four Forts sends out messengers of their own to Herodoton, seeking to figure out just what is happening. Both factions come to understand that they've been set up by a third party, the forged letters sent by the Daggermen back in Week 1. The two swear revenge. Four Forts surrenders Kalliston and Aischylon back to Herodoton as a show of good faith. The Lothar commander with the army also agrees to help eliminate the blight of the Daggermen from the banks of the river. Four Forts marches south to prepare for an attack on Ruarcc.
- The Daggermen are in disarray after the death of their leader. They reach out to their ally, Saewine, and call for assistance in defending their borders. Saewine responds by sending their new ally, Lothar, as a show of good faith.
- Lothar and the Daggermen make fast friends. Lothar is at this point attempting to complete every single one of their objectives via pure diplomacy. They need to perform a ritual in a fortress held by the Daggermen, so they agree to help defend the environs from further raids by Mataucia.
- Mataucia, after their assassination of the Daggermen leader, immediately left the Daggermen lands with no intention of returning anytime soon. Their western forces march west to strike at Osbeort, a mirror attack of the one that happened Week 1. The attack is pushed back but not before the chain blocking the river at Osbeort is broken, accomplishing one of Mataucia's victory objectives.
- The stray Herodoton raiding party that was chased into Saewine finally makes it back to friendly lands, having had to off-road march for several weeks at this point to get back.
Week 5:
- Lothar's subcommander with the Four Forts ponders the fact that he has not discussed anything with his faction leader in several weeks and makes an abrupt departure from the allied army. This occurs while his faction leader is, unbeknownst to him, merely a day away in diplomatic discussion with the Daggermen. The subcommander marches far to the east and south to return to Lotharian lands and find out what the rest of his faction has been up to. The faction leader of Lothar starts up his necessary ritual in Fort Grainne of Daggermen control.
- The Daggermen are still panicked about an expected attack from Mataucia. Their faction leader sails to Osbeort to entreat directly with the Saewine faction leader, ironically only a few days after the Mataucian attack on the city. Saewine completes their massive war fleet and sails back with the Daggermen to strike at Mataucia via the rivers on its eastern border.
- Mataucian forces probe east and west for vulnerable targets. Raids along the border with Saewine continue, as do raids along the eastern border with Herodoton. Mataucia torches the land near the town of Heron, then retreats back over the border. The eastern raiding party then immediately attempts to parlay with Herodoton at Ptolemaion, prompting a confused Herodoton to accept.
Week 6:
- Saewine's war fleet dwarfs the defenses at Thiemo, including the Mataucian faction leader. The town is taken and the defending armies forced into retreat.
- Herodoton marches south, finding Fort Grainne with a Lothar army parked inside. They had spotted Lothar with Four Forts weeks ago at Aischylon, so seeing Lothar in Daggermen lands seemingly allied with them was very suspicious. The two armies meet in parlay and discuss possible alliances before Herodoton runs the Lothar faction leader through with a sword. Herodoton continues marching south and captures the town of Aednat as well as one of the Daggermen subcommanders. Herodoton's eastern forces also sail across the river to the east and begin sieging Cellach.
- Saewine sails back towards home after taking Thiemo. They find Mataucia's western forces attempting to take Cynesige and drive them off.
- Daggermen forces retreat to Gormlaith, seeking to piece together a strategy moving forward.
Week 7:
- Saewine splits up their war fleet and sends half to Gormlaith to assist the Daggermen. Their western forces are successful in driving out Mataucia's raiding forces. The other half of the war fleet sails back to Osbeort to recuperate and form a new strategy.
- Lothar's new faction leader sails west from Aquilline and up the river, heading to where their old leader was last spotted. They meet up with the Daggermen and Saewine fleets and form a massive bloodthirsty push north into Herodoton territory, seeking blood.
- The Daggermen allied fleet successfully attacks Herodoton and captures the faction leader, whom Lothar immediately executes. This is at the cost of the fleet leaving Gormlaith unattended, which Four Forts capitalizes on and captures.
- Mataucia's eastern forces are led astray by confusing messages from Herodoton implying that one of their own was captured. Mataucia's western forces are driven back from Cynesige after a lengthy siege.
Week 8:
- The Daggermen allied fleet pushes north after the remnants of the Herodoton fleet, seeking to push their advantage. A massive battle is fought at the harbor in Ptolemaion, which the allied fleet is pushed out of.
- Herodoton reels after the loss of their faction leader and subsequent forced retreat into Ptolemaion. They manage to regroup and push out a counterattack with mercenary fleets, pushing the allied fleet back downriver towards Gormlaith.
- Four Forts scouts south and north, probing the defenses at Ruarcc for a possible attack.
- Mataucia regroups in the wilderness and marches south, taking and torching the Daggermen town of Aneirin. Finding no resistance, Mataucia pushes for a quick victory and sends troops via mercenary fleet to snatch Glaedwin. They're successful in taking the city, completing their last objective and ending the game.