Tips and Tricks for Cataphracts
I mentioned that I had some smaller tips and thoughts on how to run a Cataphracts game of your own in my last post. Folks mentioned they wanted to hear 'em, so I thought I'd make this post collecting all the minutia that helped my game run smoothly.
Initial Setup
======
I got my map by cutting out a chunk of Pathfinder's setting map, link here. I found it more ideal than using a real-world map because it didn't have as much detail while still being interesting enough to not be a flat plain. If you do the same, make sure you remove Locations, Labels and Borders by adding "hideLocations=true&hideLabels=true&hideBorders=true" to the URL.
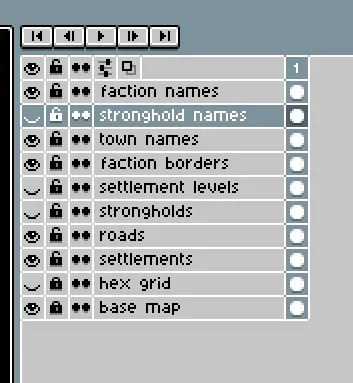
I pulled the base image of the map into an image editor (I used Aseprite because I own it, but anything would work). Make sure you make any additions on their own layer because it'll make it a lot easier to provide different views of the map, like a player-facing view or a settlement level view. I ended up with these layers:
I generated all the names for my factions and cities using a random name generator and just ensuring I was using the same culture for a single faction.
Tools
=======
- I kept track of the world and all the army placements by taking the map and pasting it into a VTT. I use Shmeppy because I'm a creature of habit and am already paying for it, but any VTT would do. The crucial piece you need is a grid and the ability to upload background images. You can then place down tokens for armies and track movement via the grid as well as the underlying hexes. Here's a snip of what my map looks like:
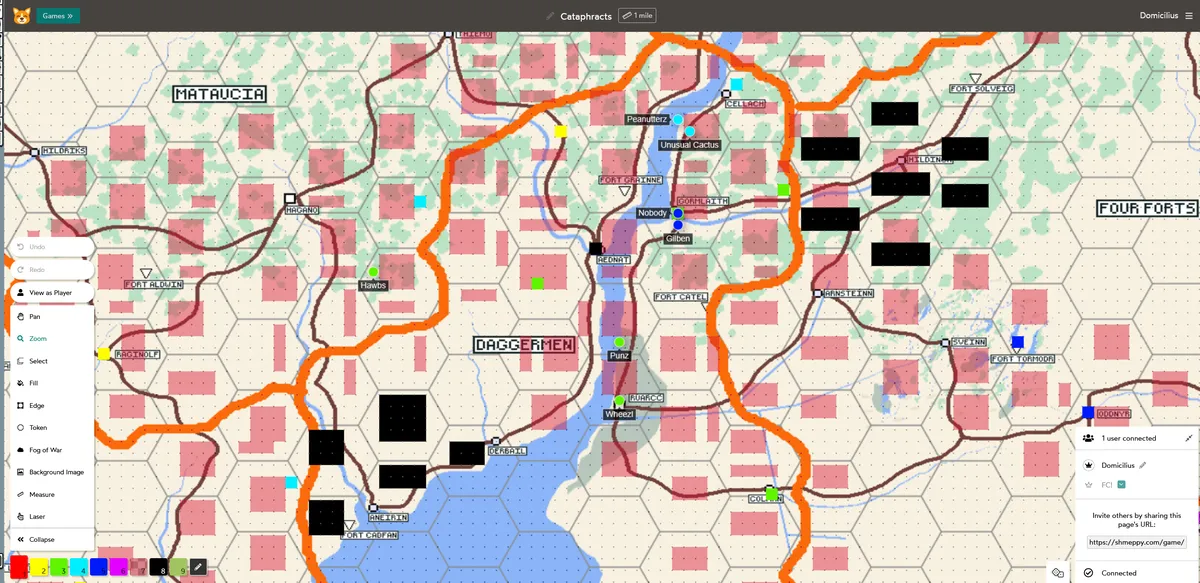
The red squares you see over most of the hexes are me marking which hexes have been foraged from using a semi-opaque color using Shmeppy's fill tool. The color-coded squares that match faction colors mark that a faction dropped something on the ground there (supplies / loot). The black squares indicate torched earth. When I uploaded the image, I vaguely lined up the map such that 6 squares lined up with the span of hex, allowing me to equalize 1 grid square = 1 square mile. This helps a lot when you're moving 10 or 12 armies in a day, you just move them 12 squares along a road.
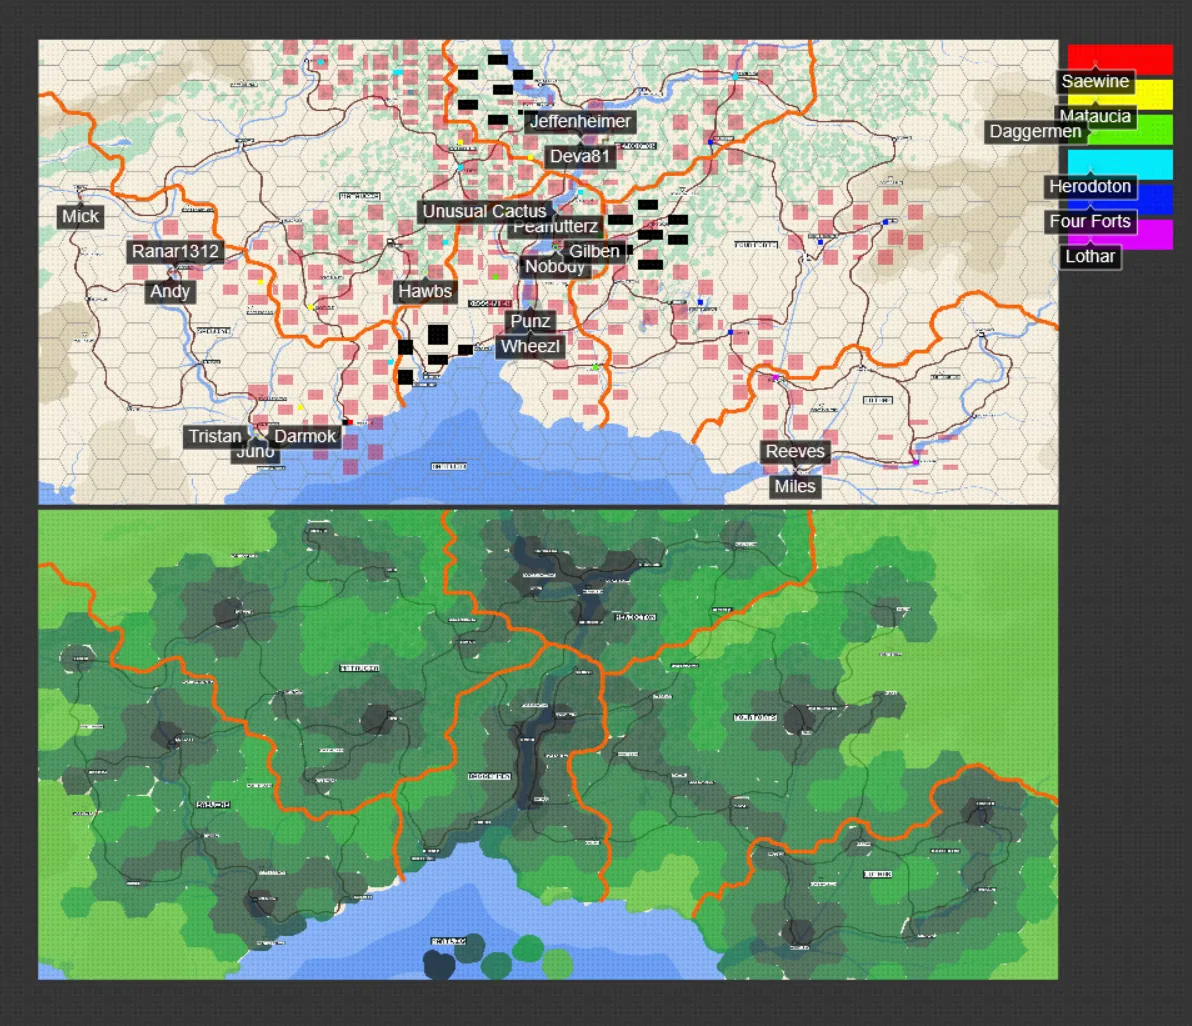
- Wherever you put your main map, also upload a version of your map with settlement levels alongside it. You'll need to cross-reference the map a lot in play when folks forage or recruit armies so you'll want it handy. If you leave your map in an image editor, you can quickly flick the settlement level layer on and off. This means you lose the grid movement gains from a VTT but may make it easier, ymmv.
Keep a log of all army actions in a day, including inaction. Make sure whenever you process orders in a day that you record the results in both your log as well as your thread with the commander. You'll appreciate the effort put in when you have to fix a mistake later or check on something that happened a month ago. My log looks like this.
When you need to track a completion date in the future, just add it to your actions log under a future date. That way, when you finally get to that day, you'll already have it recorded as occurring and you'll see it during processing.
For tracking army supplies and troop compositions, just use Sam's spreadsheet. It works great. Just make duplicated new tabs for subcommanders. I highly recommend including all traits of commanders at the top of their spreadsheet tab so you have it handy.
Rulings in Play
======
For tactics bonuses for battles, I gave a +1 whenever a commander wrote anything to me regarding strategy, a +2 if I thought the strategy was good, and +3 if both commanders had a tactics bonus but I thought one side was better.
Whenever I processed orders in a day, I would allow for late submissions of orders until the next processing the day after. This allows for life to happen, for timezone shenanigans to occur, and for minor hiccups to not influence play too broadly. It does sometimes allow for "rubber-banding" where one player takes an action "yesterday" then takes another one "today" and thus steals a march on an opponent, but the gains are worth the negatives.
If you use Discord threads to keep track of commander communication, force them to mark any explicit orders with a certain emoji (we used :scroll:). Some people just love to yap (myself included), especially when they're discussing matters with allies or asking clarifying questions. When you're keeping track of 20 different threads in a day, you don't have time to read the full context all the time and that's where the marked orders come in handy.
Sam didn't include any spells in his original doc, so I stole some from other books as well as made some up. Here's the ones I used:
Abdication of Temporal Presence
The commander and their army take 1 day's worth of actions (typically moving). They cannot interact with any other entity or army.Phantom Legion
A facsimile of the commander and their army appear and act at the command of the caster for a period of 3 days. The phantom is made from light and smoke, they cannot speak or interact physically with anything.Deluge of Hell
Deal 5% casualties to a mobile force, or 10% to an entrenched one as fire and molten rock rains from the heavens.Instant Fortress
A fortress made from clay forms around the command, sufficient to act as any stronghold. While the walls initially hold firm, the walls will melt in rain or poor weather, and even in good weather will only last 3 weeks.Tremors of the Depths
Open the gates of a siege and prevent cavalry from charging over the nearby ground (count as 3 instead of 4 for purposes of casualties).Last March of the Dead
Raise a detachment of 500 infantry as skeletal soldiers. They do not eat, they do not sleep, and they last only the span of 72 hours.
I ruled any assassination attempt put both sides into single combat. For death and dismemberment, I used: [1-5: Cool Scar, 6-10: Loss of Limb, 11-15: Heroic Death, 16-20: Ugly Death]. Regardless of who won or lost, I triggered a battle immediately after.
I ruled that peasant revolts could be bought off with supplies equal to 25x their size. They would also do this by themselves if there were supplies on the ground but no armies in range for them to attack. I ruled it this way because commanders would intentionally trigger revolts and try to high tail is out of range, leaving a group of rowdy peasants in their wake. Diegetically it didn't make a lot of sense for peasants angry at over-harvesting to continue to wander in circles when their harvest was still recoverable and the target of their ire was no longer in sight.